WordPressでAPIを使ったサイトを作りましたのでカスタマイズ方法を記録しておきます。
作ったのは全国のハーブティー専門店が検索できるセレクトハーブ.comというサイトです。
使っているAPIはGoogle MAP APIとホットペッパーです。
Google APIの基本知識については、他に紹介しているサイト様が多数ありますので省略いたします。
このあたりを参考にしてみてください。
(Google Maps入門(Google Maps JavaScript API V3))
こちらではWordPressにGoogleAPIで地図を表示させるための方法を紹介したいと思います。
APIを使いこなす為にインストールしたプラグイン
まず、WordPressでAPIを便利に使うために関連プラグインをインストールします。API関連で使っているのは2つです。
- カスタムフィールドの管理を簡単にするプラグイン「Custom Field Template」
- カテゴリーページでカスタムフィールドを増やすプラグイン「Category Meta plugin」
APIを使いこなすには「カスタムフィールド」の知識があれば非常に便利です。
使い方は共通していて、
カスタムフィールドを作る⇒single.php、archive.phpで読み込む
という手順です。
Custom Field Template
Custom Field Templateは投稿ページに定型のカスタムフィールドの入力欄を作ることができるプラグインです。
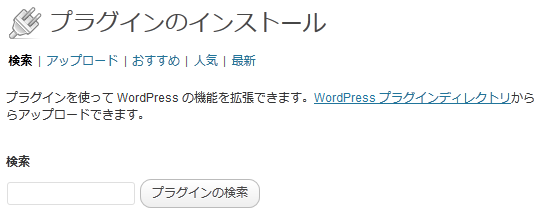
ではプラグインをインストールして具体的にカスタムフィールドを作っていきましょう。
Custom Field Templateの使い方
プラグインをインストールし、設定⇒「カスタムフィールドテンプレート」をクリックします。
入力する欄はたくさんありますが、使っているのは2つだけです。

- テンプレートタイトルに「お店情報」と入力します。
- テンプレートコンテンツに下記のテキストを入力します。
[html]
[live]
type = text
size = 50
label = 住所
[shop_tel]
type = text
size = 35
label = 電話番号
[shop_time]
type = text
size = 35
label = 営業時間
[shop_holiday]
type = text
size = 35
label = 定休日
[shop_url]
type = text
size = 35
label = 店舗HP
[Map_lat]
type = text
size = 35
label = 緯度
[Map_lng]
type = text
size = 35
label = 経度
[/html]
次に「投稿ページ」へ移動します。

記事を書いている投稿ページで「読込」ボタンを押すと作ったカスタムフィールド欄が現れるようになります。
このように必ず入力する(表示させる)項目がある場合には、カスタムフィールドを使ってsingle.phpでその内容を読み込ませる方法が便利です。
※投稿ページでのGoogle Mapを表示させる緯度と経度は他のAPIとの連携も考えて分けています。
single.phpでのコード
[html]
/* カスタムフィールド欄の「live」が入力されていたら表示 */
<?php if ( get_post_meta($post->ID,’live’,TRUE) ): ?>
/* Google map 表示部分 */
<div id="map" style="width: 100%; height: 200px;"></div>
<!–▽Google Api script–>
<script type="text/javascript">
google.maps.event.addDomListener(window, ‘load’, function() {
var mapdiv = document.getElementById( ‘map’ );
var myOptions = {
zoom: 17,
center: new google.maps.LatLng( <?php echo post_custom("Map_lat")?>,<?php echo post_custom("Map_lng")?> ),
mapTypeId: google.maps.MapTypeId.ROADMAP,
scaleControl: true
};
var map = new google.maps.Map( mapdiv, myOptions );
var marker = [];
var infowindow = [];
marker[0] = new google.maps.Marker({icon: ‘http://maps.google.co.jp/mapfiles/ms/icons/blue-pushpin.png’,position: new google.maps.LatLng(<?php echo post_custom("Map_lat")?>,<?php echo post_custom("Map_lng")?>),
map: map,
title: ‘<?php the_title(); ?>’
});
var markerCluster = new MarkerClusterer( map, marker );
});
</script>
<!–△Google Api script–>
<div class="infobox">
<table>
<tr><td width="100px">住所</td><td><?php echo post_custom("live")?><br /><?php echo post_custom("Address")?></td></tr>
<tr><td width="100px">電話番号</td><td><?php echo post_custom("shop_tel")?></td></tr>
<tr><td width="100px">営業時間</td><td><?php echo post_custom("shop_time")?></td></tr>
<tr><td width="100px">定休日</td><td><?php echo post_custom("shop_holiday")?></td></tr>
<tr><td width="100px">口コミ評価</td><td><?php if(function_exists(‘the_ratings’)) { the_ratings(); } ?>(5段階の口コミ評価です。星を選択することで評価できます。皆様の口コミ評価をお待ちしています!)</td>
</tr>
<tr><td width="100px">店舗HP</td><td><a href="<?php echo post_custom("shop_url")?>" target="_blank"><?php the_title(); ?></a></td></tr>
</table>
</div>
<?php endif;?>
[/html]
★phpコードに関してはほぼこちらのサイト様
(WordPressとプラグインを使ってお店紹介サイトを作る方法を構築する方法全部教えます!!)
のコードを使わせて頂いております!!ありがとうございました!
※口コミ評価を表示させるプラグインを入れていない場合は、上記のphpコードから口コミ評価の部分を削除して下さい。
Category Meta plugin
続いてカテゴリページでGoogle Mapを表示させるために使うプラグイン「Category Meta plugin」を紹介いたします。
このプラグインがあれば、カテゴリの設定ページでカスタムフィールドのような入力する欄を自由に作ることができます。
「カスタムフィールドを増やす」という言い方が正しいかどうかは分かりませんが、私の中では投稿ページのカスタムフィールドと同じイメージです。
(正式にはcustom taxonomies「terms」を作ります)
では、プラグインをインストールしてカスタムフィールド(meta list)を増やしていきましょう。
Category Meta pluginの使い方

増やし方はとっても簡単で、設定⇒Category Metaを選びます。
Meta Nameに任意のカスタムフィールド名を入力し、Meta Typeを選択します。

具体的にはこのようにカスタムフィールド(Meta List)を3つ作りました。
- gmap_cate ⇒Google Mapの地図コードを入力
- gmap_zoom ⇒Google Mapのズームを入力
- cate_sublink ⇒カテゴリページで任意のhtmlコードが使える
この設定が終われば、カテゴリページの設定ページに移動してみて下さい。
投稿⇒カテゴリで先ほど作ったCategory Metaを入力する欄が下のほうに現れていると思います。

これを使えばカテゴリごとにGoogleマップの表示を変えることが出来るようになります。
archive.phpでのphpコード
次にカテゴリのテンプレートに移動します。
Google Map APIを使ってカテゴリページに地図を表示させるコードはこちらです。
[html]
<?php
$cat = $wp_query->get_queried_object();
$category_id = $cat->term_id;
if(function_exists(‘get_terms_meta’)) {
$text = get_terms_meta($category_id, ‘gmap_cate’);
$text = $text[0];
$text2 = get_terms_meta($category_id, ‘gmap_zoom’);
$text2 = $text2[0];
$text3 = get_terms_meta($category_id, ‘cate_sublink’);
$text3 = $text3[0];
} ?>
<?php echo ($text3); ?>
<script type="text/javascript">
google.maps.event.addDomListener(window, ‘load’, function() {
var mapdiv = document.getElementById( ‘map’ );
var myOptions = {
zoom: <?php echo ($text2); ?>,
center: new google.maps.LatLng( <?php echo ($text); ?> ),
mapTypeId: google.maps.MapTypeId.ROADMAP,
scaleControl: true
};
var map = new google.maps.Map( mapdiv, myOptions );
var marker = [];
var infowindow = [];
<?php $m=0; $m1=0; $m2=0; $i=0; $i2=0; ?>
<?php while (have_posts()) : the_post(); ?>
marker[<?php echo $m++; ?>] = new google.maps.Marker({
icon: ‘http://maps.google.co.jp/mapfiles/ms/icons/blue-pushpin.png’,
position: new google.maps.LatLng( <?php echo post_custom("Map_lat")?>,<?php echo post_custom("Map_lng")?> ),
map: map,
title: ‘<?php the_title(); ?>’
});
infowindow[<?php echo $i++; ?>] = new google.maps.InfoWindow({
content: ‘<a href="<?php the_permalink(); ?>"><?php the_title(); ?></a>’,
size: new google.maps.Size( 50, 30 )
});
google.maps.event.addListener( marker[<?php echo $m1++; ?>], ‘click’, function() {
infowindow[<?php echo $i2++; ?>].open( map, marker[<?php echo $m2++; ?>] );
});
<?php endwhile; // End the loop. Whew. ?>
var markerCluster = new MarkerClusterer( map, marker );
});
</script>
<p>☞ 地図上にあるマークや数字をクリック(タップ)すると店舗詳細へのリンクが表示されます。</p>
<div id="map" style="width: 100%; height: 350px;"></div>
[/html]
カテゴリページもカスタムフィールド(meta list)で入力したものをで読み込んで、archive.phpに表示させるというやり方をしています。
PHPコードは、同じくWordPressとプラグインを使ってお店紹介サイトを作る方法を構築する方法全部教えます!!さんを参考にさせていただいています。
※地図のマーカーをまとめる方法につきましては、Google Maps API MarkerClustererを使ってマーカーをまとめるをご覧下さい。
私はカテゴリページでズーム率や地図の位置、任意のhtmlが入力できるようにカスタマイズしました。
カスタムフィールドの使い方はWordPressプラグイン & WebAPI 活用ガイドブック [Version 3.x対応]が非常に参考になりますので、興味がある方は一度読んでみると良いと思います。
ここでは書いていませんが、個別ページに表示させるようにしているホットペッパーのAPIコードは本に書いてあるものをそのまま利用させて頂いています。ありがとうございましたm(_ _)m